Introduction
As enterprises continue to move more workloads to the cloud, the need for private cloud services that can be deployed on-premises or in a hybrid cloud environment becomes increasingly important. For organizations that want the flexibility and control of a private cloud, but don’t want to invest in the hardware and infrastructure required to build and maintain one, kolla-ansible and openstack offer an appealing solution.
Kolla-ansible is a tool for deploying openstack services on top of an existing infrastructure. It is designed to be easy to use and operate, and can be deployed on a wide variety of platforms, including bare-metal, virtualized, and containerized environments.
openstack is a popular open source platform for building private and public clouds. It is composed of a number of modular services that can be deployed individually or together to provide a complete cloud solution.
In this blog post, we will show you how to use kolla-ansible to deploy a private cloud service using openstack. We will assume that you have a basic understanding of Linux and networking, and that you have a server or virtual machine running Ubuntu 18.04.
We will use Google Cloud Platform (GCP) to deploy our cloud service, but the same steps can be used to deploy on other cloud providers, such as Amazon Web Services (AWS).
Prerequisites
Before we begin, you will need to have the following:
- A Google Cloud Platform (GCP) account
- Google Cloud SDK installed on your local machine
- Linux OS on your local machine: This work has been tested on Ubuntu and Debian.
Project Setup
Step 1: Create a GCP project
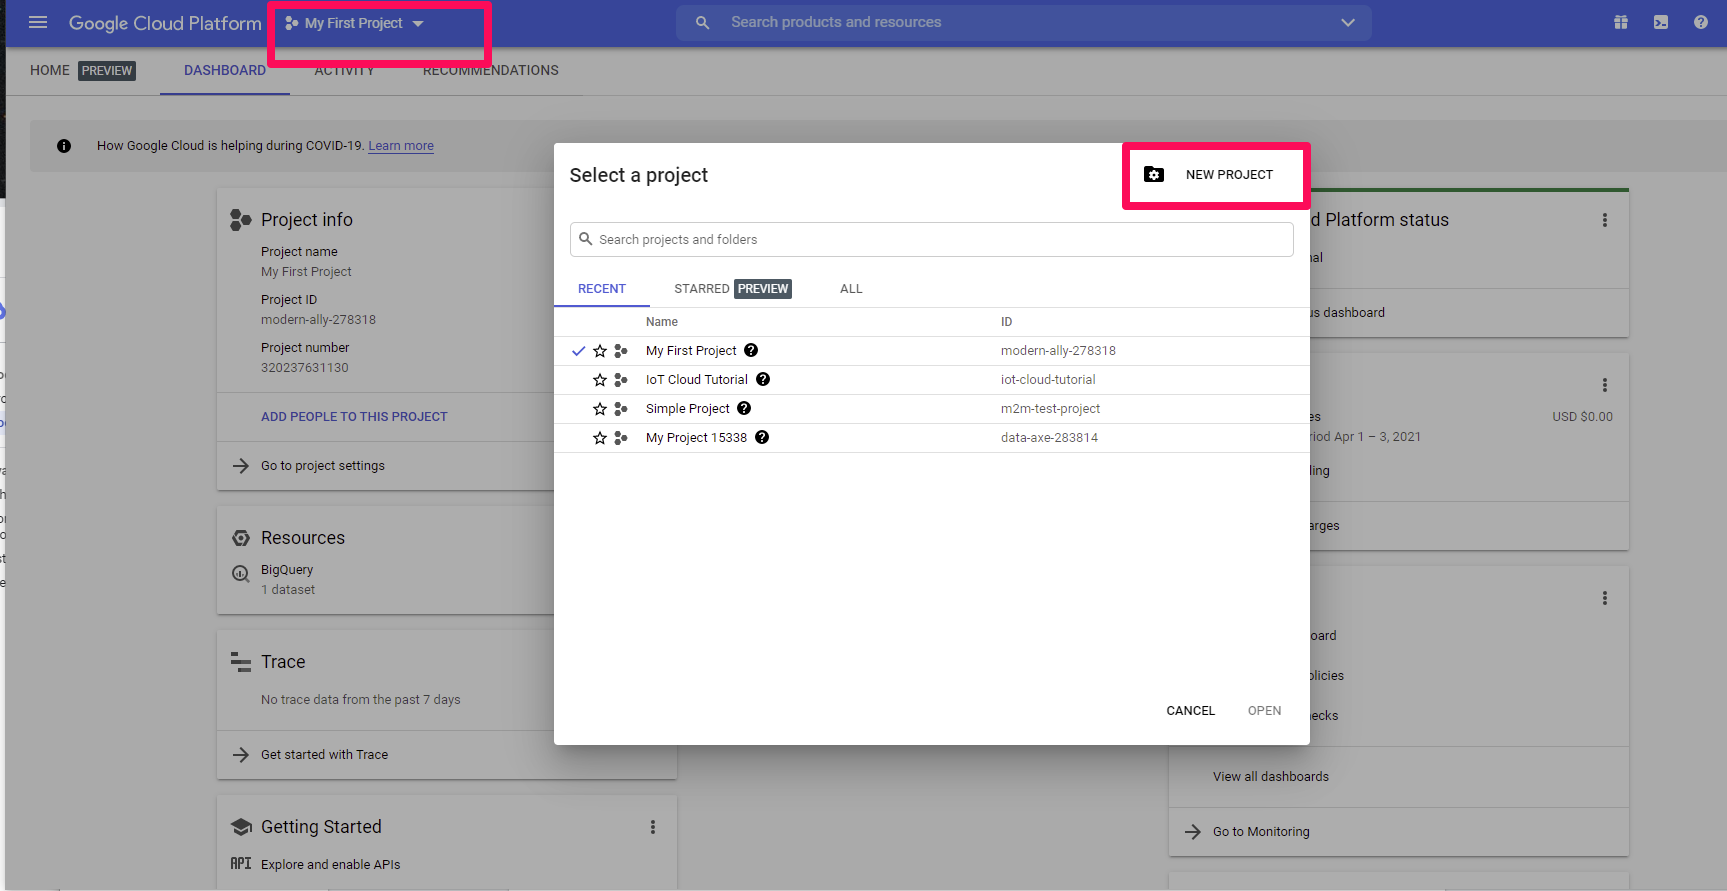
To get started, log in to your GCP account and create a new project. You can do this by clicking on the menu icon in the top left corner of the console, and selecting “New Project”.
Give your project a name, and click “Create”.
Step 2: Create VPC networks
Next, we will create two VPC networks for our cloud service. This will allow us to isolate our cloud service from other resources in our project.
First, we will create a private ssh key to be able to run shell scripts on our GCP instances. To do this, run the following command:
1
2
ssh-keygen -t rsa -f <ssh key name> -C <username of ur current terminal>
chmod 600 <ssh key name>
Then, we will copy the public key with the user name to a new file.
1
echo -n <username of ur current terminal>:$(cat <ssh key name>.pub) > metadata.txt
Finally, we upload the public key to GCP.
1
gcloud compute project-info add-metadata --metadata-from-file ssh-keys=metadata.txt
To ssh into a VM do:
1
ssh -i <ssh key name> <username of ur current terminal>@<external ip address of the VM>
if you get publickey error then make sure the ssh key is in the folder and chmod 600 again
The following script will spin up 3 VMs for our cloud service following the next steps:
- Create two VPC networks, one for the cloud service, and one for the external network. The external network will be used to connect to the cloud service from the internet.
- Create a subnet for each network and assign an IP range for each subnet.
- Create a disk based on an “Ubuntu Server 18.04” image in your default zone and set the size to at least 100GB
- Use the disk to create a custom image and include the required license for nested virtualization
- Start 3 VMs that allow nested virtualization: 2 compute nodes and 1 controller node
- Create a firewall rule to allow TCP, ICMP, UDP traffic for the IP ranges for the two subnets predefined in step 2.
1
2
3
4
5
6
7
8
9
10
11
12
13
14
15
16
17
18
19
20
21
22
23
24
25
26
27
28
29
30
31
32
33
34
35
36
37
#!/bin/sh

# initial variables
USER_NAME='cc_2020'

######## color variables for the echo command
COLOR='\033[0;32m'
DEFCOLOR='\033[0m'
###################

# ip source ranges. Feel free to change them
IPRANGE1='172.28.0.0/24'
IPRANGE1_2='10.1.0.0/16'
IPRANGE2='172.24.0.0/24'


# create two VPC networks.
gcloud compute networks create cc-network1 --subnet-mode=custom
gcloud compute networks create cc-network2 --subnet-mode=custom

# create respective subnet for each VPC network
gcloud compute networks subnets create cc-subnet1 --range ${IPRANGE1} --secondary-range range1=${IPRANGE1_2} --network=cc-network1 --region=europe-west3
gcloud compute networks subnets create cc-subnet2 --range ${IPRANGE2} --network=cc-network2 --region=europe-west3

# create custom disk with ubuntu image and nested virtualization license
gcloud compute disks create cc-openstack-tutorial --size=100GB --zone=europe-west3-c --image=ubuntu-1804-bionic-v20201116 --image-project=ubuntu-os-cloud

gcloud compute images create cc-nested-vm-image --source-disk cc-openstack-tutorial --source-disk-zone europe-west3-c --licenses "https://www.googleapis.com/compute/v1/projects/vm-options/global/licenses/enable-vmx"

# Create the three instances: 2 compute nodes and 1 controller node
gcloud compute instances create controller --zone=europe-west3-c --image=cc-nested-vm-image --boot-disk-size=100GB --machine-type=n2-standard-2 --tags=cc --network-interface "subnet=cc-subnet1,aliases=range1:/24" --network-interface "subnet=cc-subnet2"
gcloud compute instances create compute1   --zone=europe-west3-c --image=cc-nested-vm-image --boot-disk-size=100GB --machine-type=n2-standard-2 --tags=cc --network-interface "subnet=cc-subnet1" --network-interface "subnet=cc-subnet2"
gcloud compute instances create compute2   --zone=europe-west3-c --image=cc-nested-vm-image --boot-disk-size=100GB --machine-type=n2-standard-2 --tags=cc --network-interface "subnet=cc-subnet1" --network-interface "subnet=cc-subnet2"

# Create the firewall rules
gcloud compute firewall-rules create cc-openstack-tutorial-fw-rule1 --network cc-network1 --action=ALLOW --rules=tcp,udp,icmp --source-ranges=${IPRANGE1},${IPRANGE1_2},${IPRANGE2} --target-tags cc
gcloud compute firewall-rules create cc-openstack-tutorial-fw-rule2 --network cc-network2 --action=ALLOW --rules=tcp,udp,icmp --source-ranges=${IPRANGE1},${IPRANGE1_2},${IPRANGE2} --target-tags cc
Step 2: Verify the VMs are up and running properly
- Check nested virtualization support. Each VM should have VMX enabled. Execute:
1
grep -cw vmx /proc/cpuinfo
The response indicates the number of CPU cores that are available for nested virtualization. A non-zero return value means that nested virtualization is available. If you get 0, you need to revisit step 3.
- Each instance should have 2 NICs and 2 internal IP addresses. Check via gc dashboard, gc command line or run ifconfig or ip link show within the VMs.
- ssh to all VMs must work:
1
 ssh -i /path/to/id_rsa <user>@<public_ip>
If it doesn’t work, check you firewall rules (especially step 7).
- Check the connectivity between the VMs. From each VM, ping the other two VMs:
1
 ping <public_ip_of_other_vm>
If it doesn’t work, check you firewall rules (especially step 6).
- Connect via ssh to instances and test tcp traffic to internal IP addresses of the other 2 instances:
1
 nc -z -v <internal ip adress> 22
If it doesn’t work, check you firewall rules (especially step 6).
Step 3: Install OpenStack
We will use Ansible and kola-ansible to deploy openstack on the 3 previously created virtual machines. You can also refer to the steps we are going to execute in the Kolla-Ansible documentation.
General requirements:
- You must have a non-root user with sudo rights on your local machine.
- Check the kolla-ansible quick start guide and install required kolla-ansible dependencies for your local machine.
- Create and activate a python3 virtual environment on your local machine.
- Use pip to install ansible and kolla-ansible.
Prepare Kolla-Ansible
- Create a directory for your kolla-ansible configuration files. We will use /home/
/kolla-ansible. - Download and unpack the kolla-ansible.zip provided in the source code.
- Open the files “multinode” and “globals.yml”. Replace the placeholders “[**<>**]” with respective values.
Example:
1
2
3
kolla_base_distro: "ubuntu"
kolla_internal_vip_address: "10.34.122.100"
ansible_user=alex
Deploy OpenStack
To deploy openstack, we have prepared a script that will execute the following steps:
- cd into your working directory.
- To verify that ansible is setup correctly and the VMs are reachable run
1
 ansible -m ping all -i ./multinode
In case of failure:
- Check your ssh keys and connection to the VMs.
- Check correct installation of ansible
- Revisit Prepare kolla-ansible and check if the placeholders were replaced correctly.
- Run the commands from deploy-openstack.sh
Tips:
- If the kola-ansible “prechecks” command fails for localhost (especially the OS version check)
- If the kola-ansible “deploy” command fails due to runtime errors, you can run the command again to continue the deployment. Verify that the occurred error is reproducible before searching for a solution.
- All steps on the VMs must pass. If not, try to resolve problems. Googling the error usually helps.
teeremoves colours from the ansible output. For initial testing and possible debugging, you can remove the piping intotee. Add it again when generating logs for final submission.- Do not be afraid to tear everything down and redeploy it. Remember to work with checkpoints.
- Check the public IP address of the controller VM via your browser. It should display the
openstacklogin landing page. If not, check your firewall rules.
Congratulations! You have successfully deployed openstack on 3 VMs and became officially a cloud provider.
Step 4: Configure OpenStack
To make sure that openstack is working properly, follow the steps below:
- Activate the previous python3 virtual environment on your local machine and install the (openstack CLI client)[https://docs.openstack.org/newton/user-guide/common/cli-install-openstack-command-line-clients.html].
- Get the keystone_admin_password value from passwords.yml to login via the
openstackdashboard (user is “admin”). - Download the admin-openrc.sh file (upper right drop-down menu) and place it into you working directory.
- Use source admin-openrc.sh to set environment variables that are used for authentication.
Hint: You can adjust the admin-openrc.sh file to prevent repeated password input.
- Test if the
openstackCLI is working:openstackhost list. It must work. If not, check the firewall rules. - Run the scripts import-images.sh and create-ext-network.sh
- Depending on the network connection of your local machine, the image upload might take a while.
- To prevent additional steps, we will use Ubuntu16.04. Images of newer versions need adjustment when using them with nested virtualization.
- Run the following script:
1
2
3
4
5
6
7
8
9
10
11
12
13
14
15
16
17
18
19
20
21
22
23
24
25
26
27
28
29
30
31
32
 #!/bin/sh

 # copy the controller external ip manually from gcp console
 CONTROLLER_IP=<external_ip_of_controller_vm>
 # directory of the sshkey used to ssh and scp into the gcp VMs
 GC_SSH_KEY_DIR=sshkey

 # create security group and add rules
 openstack security group create open-all

 openstack security group rule create open-all --ingress --protocol tcp --dst-port 1:65525
 openstack security group rule create open-all --ingress --protocol icmp --dst-port 1:65525
 openstack security group rule create open-all --ingress --protocol udp --dst-port 1:65525
 openstack security group rule create open-all --egress --protocol tcp --dst-port 1:65525
 openstack security group rule create open-all --egress --protocol icmp --dst-port 1:65525
 openstack security group rule create open-all --egress --protocol udp --dst-port 1:65525


 # TODO: Create ssh keypair and export it to openstack
 echo 'y\n' | ssh-keygen -t rsa -f openstack_sshkey -C openstack_user -N ""
 chmod 400 openstack_sshkey
 openstack keypair create --public-key openstack_sshkey.pub openstack_keypair


 # scp -i <gc ssh key> <openstack ssh key file> username@external_ip_of_controller:/home
 scp -i ${GC_SSH_KEY_DIR} openstack_sshkey $USER@${CONTROLLER_IP}:/home
 ssh -i ${GC_SSH_KEY_DIR} $USER@${CONTROLLER_IP} "chmod 400 /home/openstack_sshkey"

 openstack flavor create --id 0 --vcpus 2 --ram 4096 --disk 40 m1.medium

 # openstack server create --flavor <flavor size> --image <image name> --nic net-id=<just admin-net. already exists> --security-group <the sg we created> --key-name <the keypair we uploaded> <instance name>
 openstack server create --flavor m1.medium --image ubuntu-16.04 --nic net-id=admin-net --security-group open-all --key-name openstack_keypair new_vm_instance
- Assign a floating IP to the VM.
- From you gc controller VM, try to ping the floating IP of your OpenStack VM. It is not working. Think about why.
- Copy the iptables-magic.sh script to you gc controller VM. Run it with sudo.
- From you gc controller VM, try to ping the floating IP of your OpenStack VM. It should work.
- From your gc controller VM, try to connect to the OpenStack VM via ssh. If you followed step 8, the key should be located on the gc controller VM. The username is “ubuntu”.
- From the OpenStack VM, try to ping an external IP address, e.g. 8.8.8.8. It should work.
- From the OpenStack VM, execute wget 169.254.169.254/openstack/2018-08-27/network_data.json. The output is found in network_data.json file.
Performance Evaluation
To evaluate the performance of your OpenStack deployment, we will follow the same methodology as in this blog
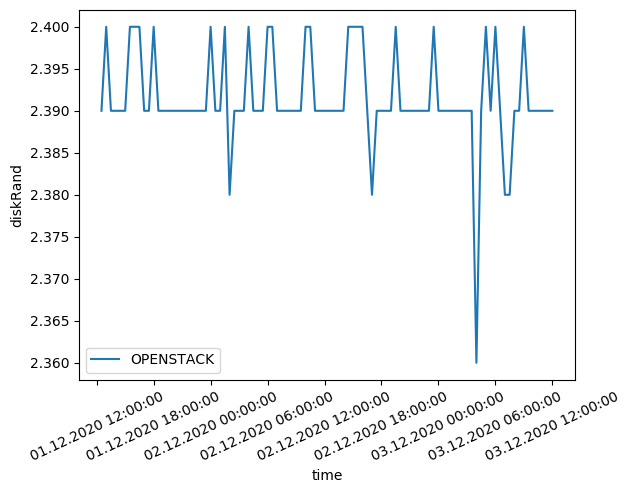
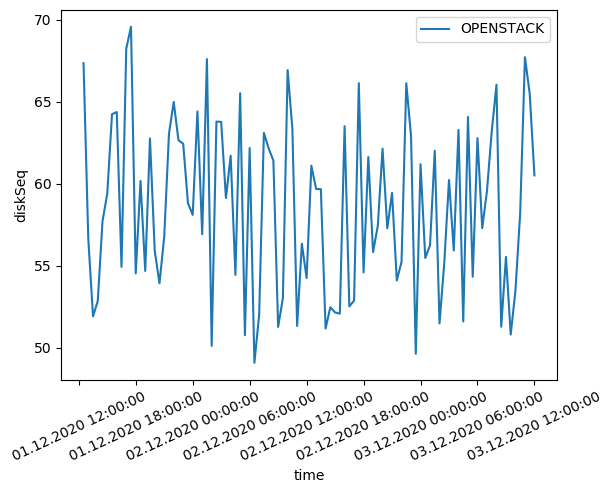
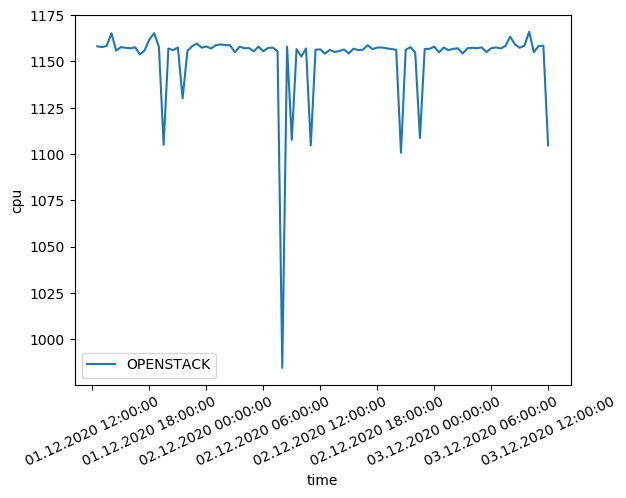
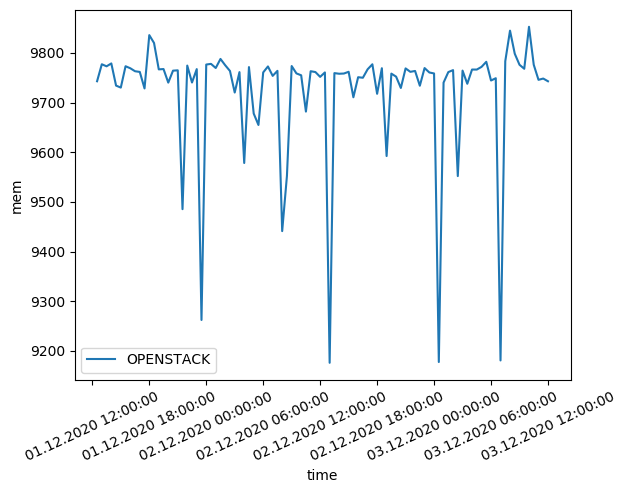
As we can see, the benchmark results of our openstack are comparable to the results of the other cloud providers. The CPU benchmark results are slightly lower than the other cloud providers. This is due to the fact that the VMs are not dedicated to the openstack deployment. The memory benchmark results are slightly higher than the other cloud providers. This is due to the fact that the VMs are not dedicated to the openstack deployment.
We also notice higher volatility in the benchmark results. This is due to the fact that the VMs are not dedicated to the openstack deployment. The VMs are shared with other users and the performance is not guaranteed.


