
Introduction
In this article, we will be comparing the performance of Google Cloud Platform (GCP) and Amazon Web Services (AWS) using the Sysbench benchmarking tool. We will be using the Sysbench benchmarking tool to test the performance of the following:
- CPU
- Memory (RAM)
- Disk random read/write
- Disk sequential read/write
Sysbench
Sysbench is a benchmarking tool that is used to test the hardware performance of a system. It is a cross-platform benchmarking tool. It is available for Linux, Windows, and Mac OS. Sysbench is a free and open-source tool. It is written in C and Lua. Sysbench is a command-line tool.
For example, sysbench evaluates CPU performance by verifying prime numbers by doing standard division of the number by all numbers between 2 and the square root of the number. If any number gives a remainder of 0, the next number is calculated putting some stress on the CPU, but only on a very limited set of the CPU’s features. It is also possible to specify the number of threads running, making it a quick and easy way to test CPU performance for various numbers of threads.
Preparation
In the following sections, we will run a benchmarking script every 30 minutes for 24 hours on both GCP and AWS. The script will run the following commands:
1
2
3
4
5
6
7
8
9
10
11
12
13
14
15
16
17
18
19
20
21
22
23
24
25
26
#!/bin/sh
# when called for the first time creates new file gcp_results.csv and adds the header to it
FILE=gcp_results.csv
if ! test -f "$FILE"; then
    echo ">>>>> initiating new file gcp_results for the first time.. <<<<<"
    echo "time,cpu,mem,diskRand,diskSeq" > gcp_results.csv
fi
# initiates new 1GB test_file for sysbench. does nothing if the file already exists
sysbench fileio --file-num=1 --file-total-size=1G prepare
# collect the measurements using sysbench
echo ">>>>> collecting timeseries.. this should take approx. 4 minutes to finish <<<<<"
D=$(date '+%s')
echo "minute 1: collecting cpu bench"
S1=$(sysbench cpu --time=60 run | grep -oP 'events\sper\ssecond:\s*\K.*')
echo "minute 2: collecting memory bench"
S2=$(sysbench memory --time=60 --memory-block-size=4K --memory-total-size=100T run | grep -oP 'MiB\stransferred\s\(\K[0-9.]*')
echo "minute 3: collecting random read bench"
S3=$(sysbench fileio --time=60 --file-test-mode=rndrd --file-num=1 --file-total-size=1G --file-extra-flags=direct run | grep -oP 'read,\sMiB/s:\s*\K[0-9\.]*')
echo "minute 4: collecting sequential read bench"
S4=$(sysbench fileio --time=60 --file-test-mode=seqrd --file-num=1 --file-total-size=1G --file-extra-flags=direct run | grep -oP 'read,\sMiB/s:\s*\K[0-9\.]*')
# concatenate the measurements as time,cpu,mem,diskRand,diskSeq and add them to gcp_results.csv
TIMESERIES="$D,$S1,$S2,$S3,$S4"
echo "adding ${TIMESERIES} and terminating"
echo "${TIMESERIES}" >> gcp_results.csv
# cleaning up the 1GB created test_file
sysbench fileio cleanup
GCP
For GCP, we will be using the following instance types:
- e2-standard-2 (2 vCPUs, 8 GB memory)
- Ubuntu 18.04 LTS
- 100 GB SSD persistent disk
1. Getting started with GCP
If you don’t have a GCP account, you can create one here and finish the billing setup. Next, you will need to create a project. You can do so by clicking on the dropdown menu on the top left corner and selecting “New Project”. You can name your project whatever you want. I named mine cloud-computing.
Finally, we need to install the Google Cloud SDK. You can download it here.
2. Spinning up a GCP instance
The following script will automatically create the instance and install the necessary packages. Make sure to adapt the initla variables to match your machine.
1
2
3
4
5
6
7
8
9
10
11
12
13
14
15
16
17
18
19
20
21
22
23
24
25
26
27
28
29
30
31
32
33
34
35
36
37
38
39
#!/bin/sh

# initial variables
USER_NAME='<linux-user-name>'
METADATA_FILE='metadata_file.txt'
TAG='cloud-computing'
INSTANCE_NAME='cc-instance'
ZONE='europe-west3-c'

######## color variables for the echo command
COLOR='\033[0;32m'
DEFCOLOR='\033[0m'
###################

# Creating ssh keys pair using specified USER_NAME
echo "${COLOR}STEP 1: create ssh-key${DEFCOLOR}"
echo -e 'y\n' | ssh-keygen -f id_rsa -C $USER_NAME

# pub key is formatted as gcloud requires and saved in a metadata file
echo "${COLOR}\nSTEP 2: transform ssh.pub to gcloud key${DEFCOLOR}"
echo -n $USER_NAME":$(cat id_rsa.pub)" > $METADATA_FILE

# add metadata_file with public ssh key to project metadata
echo "${COLOR}STEP 3: uploading the public key into the project metadata${DEFCOLOR}"
gcloud compute project-info add-metadata --metadata-from-file ssh-keys=$METADATA_FILE

# create the firewall rule for ssh and icmp
echo "${COLOR}STEP 4: create the firewall rule for ssh${DEFCOLOR}"
gcloud compute firewall-rules create allow-ssh-icmp-rule --network default --action allow --direction ingress --rules tcp:22,icmp --source-ranges=0.0.0.0/0 --target-tags $TAG

# create instance
echo "${COLOR}STEP 5: creating instance${DEFCOLOR}"
gcloud compute instances create $INSTANCE_NAME --zone=$ZONE --machine-type e2-standard-2 --image-project ubuntu-os-cloud --image-family ubuntu-1804-lts --tags $TAG

# resize disk space of the created instance
echo "${COLOR}STEP 6: resizing disk space of the created instance${DEFCOLOR}"
echo 'y' | gcloud compute disks resize $INSTANCE_NAME --size=100G --zone=$ZONE

echo "Spin up complete. You can now connect to the instance using the following command:"
3. Running the benchmarking
Now, we will prepare the benchmarking tool to run autonomously for a few hours to get accurate averaged results.
- copy
run-bash.shmanually to the instance using scp1 2
chmod 400 id_rsa scp -i id_rsa run-bash.sh <linux-user-name>@<instance-ip>:~/
- SSH into the instance
1
  ssh -i id_rsa <linux-user-name>@<instance-ip>
You can alternatively use the following command to connect to the instance
gcloud compute ssh --zone <ZONE> <INSTANCE_NAME>
- inside the instance, install the necessary packages for the benchmarking
1
  sudo apt-get update && sudo apt-get install -y sysbench cron
- Using crontab to run the benchmarking script every 30 minutes for 24 hours
1
  chmod +x run_bench.sh && crontab -l > file; echo "*/30 * * * * ~/run_bench.sh" >> file; crontab file; rm file
AWS
For AWS, we will be using the following instance types:
- t2.large (2 vCPUs, 8 GB memory)
- Ubuntu Server 18.04 LTS (HVM)
- 100 GB SSD persistent disk
1. Getting started with AWS
If you don’t have an AWS account, you can create one here and finish the billing setup. Next, you will need to create a project. You can do so by clicking on the dropdown menu on the top left corner and selecting “Create a project”. You can name your project whatever you want. I named mine cloud-computing.
Finally, we need to install the AWS CLI. You can download it here.
2. Spinning up an AWS instance
The following script will automatically create the instance and install the necessary packages. Make sure to adapt the initla variables to match your machine.
1
2
3
4
5
6
7
8
9
10
11
12
13
14
15
16
17
18
19
20
21
22
23
24
25
26
27
28
29
30
31
32
33
34
35
36
37
38
39
40
41
42
43
44
45
46
47
48
49
50
51
52
53
54
55
56
57
58
59
60
61
62
63
64
65
#!/bin/sh
# name for the generated public key pair
KEY='cc-keypair'
# image name for "Ubuntu Server 18.04"
IMG=ami-00ddb0e5626798373
#instance type <requires non-educate account>
VMTYPE=t2.large
# security group name
SG_NAME=cloud-computing-group
######## color variables for the echo command
COLOR='\033[0;32m'
DEFCOLOR='\033[0m'
###################

# making sure we have default vpc
echo "${COLOR}STEP 1: creating default VPC. outputs error when one already exists${DEFCOLOR}"
aws ec2 create-default-vpc
# alternative method to create keypair
# aws ec2 create-key-pair --key-name ${KEY} --query 'KeyMaterial' --output text > cc-keypair.pem
# create keypair. overwrite if a key exists
echo "${COLOR}STEP 2: creating keypair${DEFCOLOR}"
echo 'y\n' | ssh-keygen -t rsa -C ${KEY} -f ~/.ssh/id_rsa -N ""
# protects the private key
chmod 600 ~/.ssh/id_rsa
# import the saved key from above
aws ec2 import-key-pair --key-name ${KEY} --public-key-material fileb://~/.ssh/id_rsa.pub

# extract Default vpcId to create a new security group
echo "${COLOR}STEP 3: extracting Default vpc ID${DEFCOLOR}"
VPCID=$(aws ec2 describe-vpcs --output json | grep -oP 'VpcId\":\s*\"\K[a-z\-0-9.]*')

# create new Security Group with the default vpc-id
echo "${COLOR}STEP 4: creating new Security Group with the default vpc-id ${VPCID}${DEFCOLOR}"
SG_ID=$(aws ec2 create-security-group --group-name ${SG_NAME} --description "first security group" --vpc-id ${VPCID} --output json | grep -oP 'GroupId\":\s*\"\K[a-z\-0-9]*')
echo "sg group name ${SG_ID}"
# add tcp rule to security group
echo "${COLOR}STEP 5: adding tcp and ICMP rule to security group${DEFCOLOR}"
aws ec2 authorize-security-group-ingress --group-id ${SG_ID} --protocol tcp --port 22 --cidr 0.0.0.0/0
# add ICMP rule to security group
aws ec2 authorize-security-group-ingress --group-id ${SG_ID} --protocol icmp --port all --cidr 0.0.0.0/0

# get a valid subnet ID
echo "${COLOR}STEP 6: getting a valid subnet ID and availability zone${DEFCOLOR}"
SUBNET_ID=$(aws ec2 describe-subnets --output json | grep -oP 'SubnetId\":\s*\"\K[a-z\-0-9]*' | head -1)
AVZONE=$(aws ec2 describe-subnets --output json | grep -oP 'AvailabilityZone\":\s*\"\K[a-z\-0-9]*' | head -1)

# launch a new instance
echo "${COLOR}STEP 7: launching a new instance..${DEFCOLOR}"
INST_ID=$(aws ec2 run-instances --image-id ${IMG} --count 1 --instance-type ${VMTYPE} --key-name ${KEY} --security-group-ids ${SG_ID} --subnet-id ${SUBNET_ID} --output json | grep -oP 'InstanceId\":\s*\"\K[a-z\-0-9]*')

echo "${COLOR}STEP 8: getting vol-ID of the created instance using instance-id <${INST_ID}>${DEFCOLOR}"
VOLID=$(aws ec2 describe-instances --output json | grep -A 9999999 "${INST_ID}.*" | grep -oP 'VolumeId\":\s*\"\K[a-z\-0-9]*' | head -1)

echo "${COLOR}STEP 9: resizing volume using vol-ID <${VOLID}>${DEFCOLOR}"
NEWVOLID=$(aws ec2 create-volume --volume-type gp2 --size 100 --availability-zone ${AVZONE} --output json | grep -oP 'VolumeId\":\s*\"\K[a-z\-0-9]*')
echo "id of newly created vol <${NEWVOLID}>"

# wait until the instance is running before attaching new volume of size 100GB
while ! aws ec2 describe-instance-status --instance-id ${INST_ID} | grep -q "running";
do
echo "waiting until instance <${INST_ID}> is running..";
done

aws ec2 attach-volume --volume-id ${NEWVOLID} --instance-id ${INST_ID} --device /dev/sdf
echo "resize-job complete";
3. Running the benchmarking script
Similar to GCP steps, we will copy the run_bench.sh script to the instance and run it. We will also set up a cronjob to run the script every 30 minutes.
1
2
chmod 400 cc-keypair.pem
scp run_bench.sh ubuntu@<instance-ip>:/home/ubuntu
Then we will ssh into the instance:
1
ssh -i "cc-keypair.pem" ubuntu@<instance-ip>
install dependencies:
1
sudo apt update && sudo apt install -y sysbench cron
And finally run the script:
1
chmod +x run_bench.sh && crontab -l > file; echo "*/30 * * * * ~/run_bench.sh" >> file; crontab file; rm file
Results
CPU evaluation
The next figure shows the number of events/second for both GCP and AWS instance. Although GCP instance scores approximately 15% higher number of events/second, the standard deviation is much higher. This is due to the fact that GCP instances are shared among multiple users, and the performance of the instance can vary depending on the load of the other users. AWS instances, on the other hand, are dedicated to a single user, and the performance is more consistent.
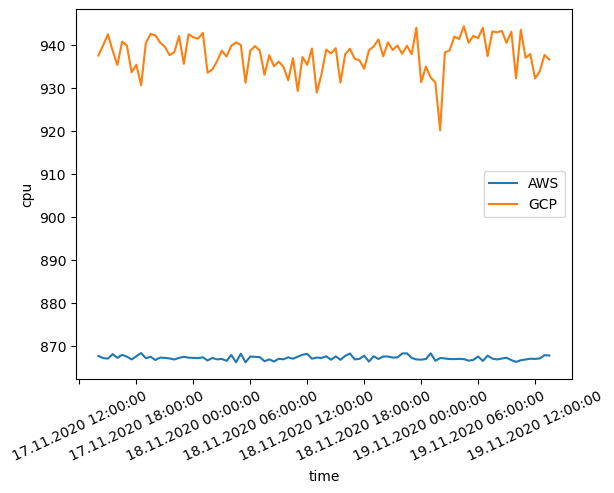 CPU performance benchmarking between GCP and AWS. The y-axis represents the number of events/second.
Memory evaluation
The benchmark application allocates a memory buffer in order to write and read from it, each time for the size of a pointer, whether it’s 32bit or 64bit, and each execution until the total buffer size has been read from or written to. This is then repeated until the provided volume (–memory-total-size) is reached. Users can provide multiple threads (–num-threads), different sizes in buffer (–memory-block-size) and the type of requests (read or write, sequential or random). The program collects timestamps before and after the reading/writing process, which then illustrates through plots how good the memory performs under heavy load.
Memory benchmarking measures the required time to write and clean heap memory from different locations. The locations are chosen such that a cache miss occurs and data is loaded directly from memory. Since the hypervisor needs to communicate at hardware level for memory requests we get considerably better results for memory in non-virtualized systems.
This time AWS outperforms GCP by a significant margin (almost 5X).
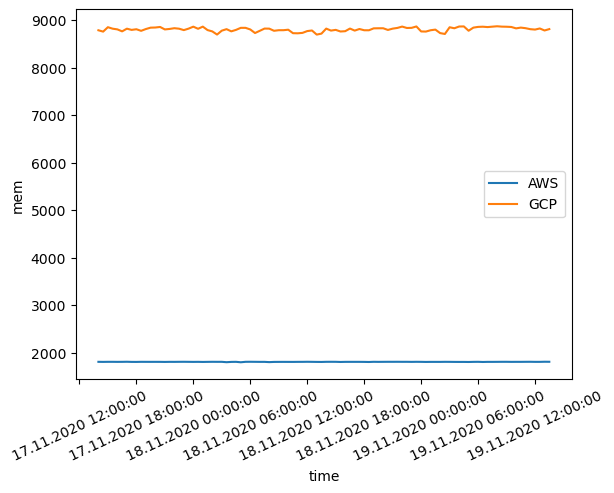 Memory benchmark results. The y-axis represents the time it takes to write and clean heap memory in milliseconds. lower is better.
Disk evaluation
SysBench creates a specified number of files with a specified total size at the prepare stage, then at the run stage, each thread performs specified I/O operations on this set of files. If the global –validate option is used with the fileio test mode, SysBench performs checksums validation on all data read from the disk.
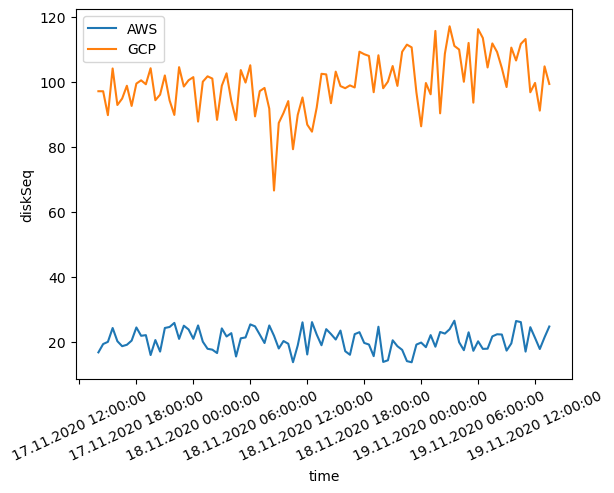
Below are two plots of sequential/random disk read benchmark results. The y-axis represents the time it takes to read 1GB of data in milliseconds. Lower is better.
 |  |
| Random disk read benchmark results. | Sequential disk read benchmark results. |
Based on the two plots above it’s clear that AWS wins random disk benchmark results, whereas GCP dominates in the sequential disk read benchmark. AWS instance provided almost the same experience in both random and sequential disk read performance evaluation. Nevertheless, the readings illustrate huge fluctuations in reading speed showing inconsistent quality of service. We use a standard persistent disk in our GCP instance.
Conclusion
In conclusion and based on the results we can safely say, AWS has substantial performance in the memory territory and great CPU performance as well when compared with GCP platform. Nevertheless, the collected performance readings are prone to change depending on the instance’s hardware specifications and upgrades.
AWS is more suitable for CPU and memory-hungry applications such as graphical applications. GCP offers more stable service and way better disk performance in terms of sequential read, which makes it more favourable for applications that read and write loads of data to the disk.